
The steady model of Ubuntu 24.04 LTS (code-named Noble Numbat) is launched on April twenty fifth 2024, in case you are curious to know what’s in it, now you can improve to the model of it from decrease model for testing functions.
Similar to each new Ubuntu launch, Ubuntu 24.04 ships with new options together with the most recent and biggest software program such because the Linux kernel, GNOME 46 and refreshed state-of-the-art toolchain. Yow will discover extra details about the brand new adjustments from the discharge notes.
Importantly, Ubuntu 24.04 LTS can be supported for five years till April 2029, for Ubuntu Desktop, Ubuntu Server, and Ubuntu Core.
This information will stroll you thru the method of upgrading your present Ubuntu 22.04 system to the most recent Ubuntu 24.04 LTS.
Step 1: Again Up Ubuntu Information
To again up your knowledge on Ubuntu 22.04 to an exterior drive earlier than upgrading to Ubuntu 24.04, you possibly can comply with these instructions:
To get began, plug in your exterior storage system like a USB drive or an exterior laborious drive, and ensure your laptop can see it.
Open the terminal and kind “lsblk” to search out your exterior drive within the record, which could look one thing like “/dev/sdb1“.
After figuring out your exterior drive, you could find its mount level by operating the df command and on the lookout for an entry similar to your exterior drive’s identifier (e.g., /dev/sdb1) within the output.
The mount level can be listed within the second column of that entry, which usually appears like “/mnt/exterior” or “/media/username/exterior“. This mount level is the place your exterior drive is at present linked and accessible in your system.
Utilizing the rsync command to again up your House listing to an exterior drive:
rsync -av –progress /dwelling/username /path/to/exterior/drive
Utilizing the tar command create a compressed archive of your House listing and put it aside to the exterior drive:
tar -cvzf /path/to/exterior/drive/backup_home.tar.gz /dwelling/username
Exchange /path/to/exterior/drive with the trail to your exterior drive and /dwelling/username with the trail to your House listing.
You may as well use graphical backup instruments like Deja Dup or Timeshift to again up your knowledge to an exterior drive.
Step 2: Getting ready Ubuntu System for Improve
Earlier than you begin upgrading your system, it’s essential to ensure there are any updates wanted. After that, replace and improve your present packages. As soon as the improve is completed, restart your system so all of the adjustments can work correctly.
sudo apt record –upgradable
sudo apt replace && sudo apt improve -y
reboot
Step 3: Improve Ubuntu 22.04 LTS to 24.04 LTS
If upgrading through SSH, make certain to open port TCP port 1022 on ufw firewall for a steady connection in the course of the improve course of.
sudo ufw enable 1022/tcp
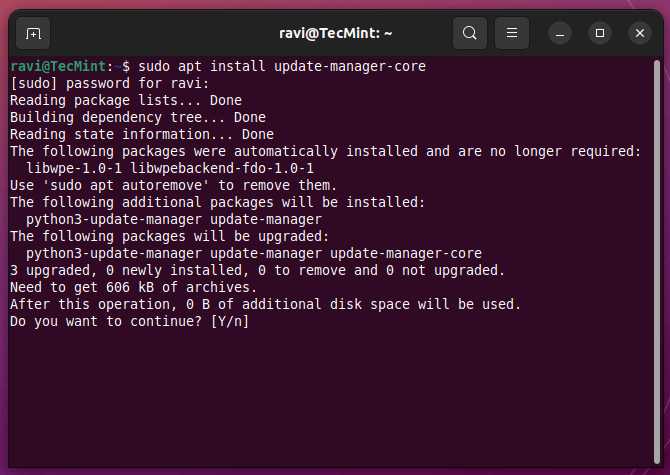
You probably have bodily entry to your Ubuntu desktop and are upgrading regionally, you don’t have to open any port. Merely set up the Replace Supervisor Core software, which can make sure that all needed instruments for the improve are put in.
sudo apt set up update-manager-core
As soon as the Replace Supervisor Core is put in, provoke the improve course of by getting into the next command.
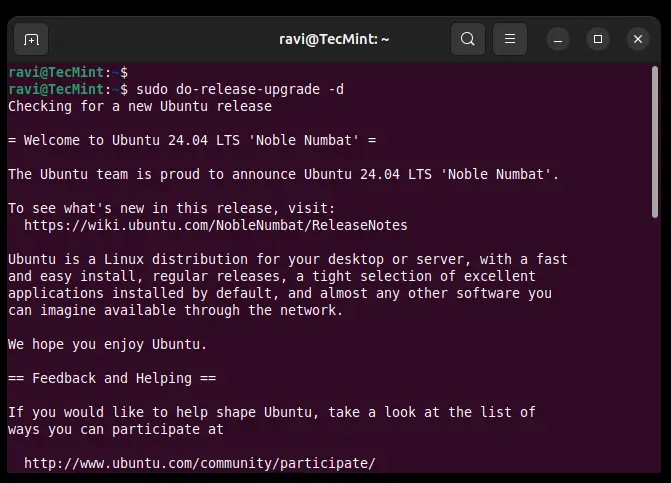
sudo do-release-upgrade -d
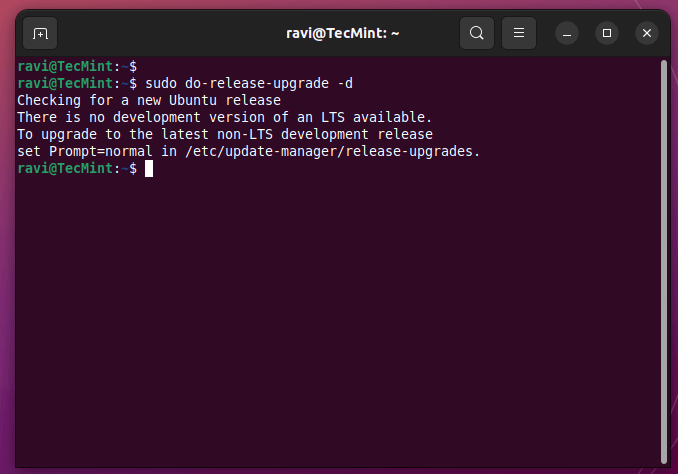
If the system doesn’t discover a new launch, and also you get the next error?
Checking for a brand new Ubuntu launch
There isn’t any improvement model of an LTS accessible.
To improve to the most recent non-LTS improvement launch
set Immediate=regular in /and so forth/update-manager/release-upgrades.
The error message you acquired signifies that you just’re attempting to improve to a non-existent improvement model of an LTS launch.
Right here’s what’s taking place and learn how to tackle it:
Ubuntu releases are available two foremost sorts: LTS (Lengthy Time period Assist) and non-LTS (improvement releases).
You possibly can’t instantly improve from an LTS model (like 22.04 LTS) to a improvement model (which isn’t even accessible).
The system is appropriately informing you that there’s no improvement model of the present LTS (24.04 LTS) but.
Because you wish to improve from Ubuntu 22.04 LTS to the most recent LTS launch (24.04 LTS), right here’s what you must do:
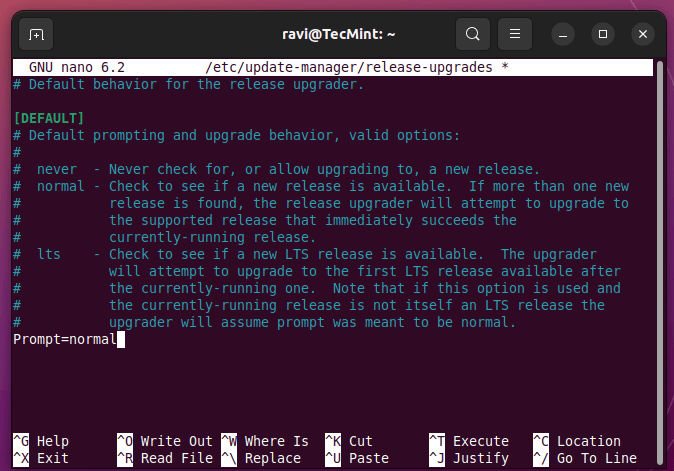
Open the /and so forth/update-manager/release-upgrades improve configuration file and alter the worth of “Immediate” to “regular“, which ensures you’ll be notified concerning the improve and have the choice to decide on whether or not to proceed.
sudo nano /and so forth/update-manager/release-upgrades
Now, use the next command to provoke the improve course of once more:
sudo do-release-upgrade
It will take you to the Ubuntu 23.10 launch, proper now, you possibly can’t improve instantly from Ubuntu 22.04 LTS to 24.04 LTS utilizing the do-release-upgrade command as a result of the official improve path isn’t accessible but.
To improve to Ubuntu 24.04, it’s a must to replace to Ubuntu 23.10 first. Then, from there, you possibly can improve to Ubuntu 24.04.

Now comply with on-screen directions to improve to Ubuntu 23.10 launch and reboot the system.
reboot
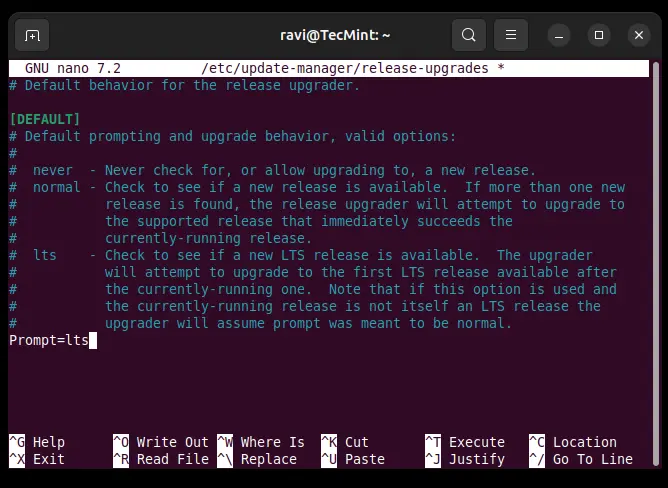
Once more open the /and so forth/update-manager/release-upgrades improve configuration file and alter the worth of “Immediate” to “lts“.
sudo nano /and so forth/update-manager/release-upgrades
Lastly, enter the command beneath after which proceed following the remainder of the information to improve from model 23.10 to 24.04 LTS.
sudo do-release-upgrade -d
Step 4: Take away Out of date Packages
To take away out of date packages after upgrading Ubuntu to make sure system cleanliness, you should use the next command:
sudo apt autoremove
Working the above command will take away any out of date packages which are not wanted in your system after the improve, which helps in liberating up disk area and retaining your system tidy and environment friendly.
Step 5: Allow Third-Get together Repositories on Ubuntu
To allow third-party repositories, you must to search out third-party repositories underneath /and so forth/apt/sources.record.d/ listing which will have been disabled in the course of the improve course of.
Subsequent, uncomment and take away the # signal in the beginning of every line for every repository within the respective recordsdata.
Affirm that the third-party repositories are enabled by operating the next command to make sure the required repositories are energetic.
ls -l /and so forth/apt/sources.record.d/
By following these steps, you possibly can efficiently allow third-party repositories on Ubuntu 24.04 after upgrading from Ubuntu 22.04.
There you go! We hope you may have efficiently upgraded your Ubuntu model from 22.04 to 24.04. When you encountered any points alongside the way in which or have ideas to share, use the suggestions type beneath to succeed in us.


/cdn.vox-cdn.com/uploads/chorus_asset/file/25601626/ad3527b123d0c8dfcca5d4968a6dcf126e37a68dd290ef85.jpg?w=120&resize=120,86&ssl=1)


